Using the Rails form builder
On this page
This guide assumes you have read the main Using with Rails guide first. The goal of this guide is to set up an example form from scratch using the design system form builder.
Configuring the form builder
Rails provides some standard form helpers for working with forms. The citizens_advice_components engine extends this by providing a custom form builder with additional methods for working with the Design System form components.
This can be configured in your application either by using the default_form_builder property in a controller:
class ApplicationController < ActionController::Base
  include CitizensAdviceComponents::Helpers

  default_form_builder CitizensAdviceComponents::FormBuilder
end
Or on a per-form basis:
<%= form_with model: @person, builder: CitizensAdviceComponents::FormBuilder do |form| %>
  <%= form.cads_text_field :first_name %%>
<% end %>
All provided form helpers are prefixed with cads_ so either option has a similar effect as you can always drop down to the standard form helpers as needed.
The full list of available form helpers are:
cads_text_fieldcads_textareacads_date_fieldcads_collection_radio_buttonscads_collection_checkboxescads_collection_selectcads_checkboxcads_buttoncads_error_summary
Defining a form model
The Design System form builder works best with a form model. These can be either full active record models or plain ActiveModel:Model objects. As long as they use standard Rails validations they should work.
To get us started let’s define a form model that contains an example of each of the supported fields and a mix of different data types and validations, representing a basic enquiry form.
# Required for cads_date_field
require "active_record/attribute_assignment"

class ExampleForm
  include ActiveModel::Model
  include ActiveModel::Attributes
  include ActiveRecord::AttributeAssignment

  attribute :first_name, :string
  attribute :last_name, :string
  attribute :your_enquiry, :string
  attribute :currency, :string
  attribute :total_amount, :string
  attribute :date_of_purchase, :date
  attribute :contacted_trader, :boolean
  attribute :trader_response, :string
  attribute :confirmation, :boolean

  validates :first_name, presence: true
  validates :last_name, presence: true
  validates :your_enquiry, presence: true
  validates :currency, inclusion: { in: %w[GBP EUR USD] }
  validates :total_amount, presence: true
  validates :date_of_purchase, comparison: { less_than: Time.zone.today }
  validates :contacted_trader, presence: true
end
Using locale files for field and error messages
We can provide field labels and error messages using the locale file. Defining labels for the form model above would look something like this:
activemodel:
  attributes:
    example_form:
      first_name: "First name"
      last_name: "Last name"
      your_enquiry: "Your complaint or enquiry"
      currency: "Currency"
      total_amount: "What was the total amount paid for the goods or services?"
      date_of_purchase: "When did you purchase the goods or services?"
      contacted_trader: "Have you contacted the trader about this complaint?"
      trader_response: "Outline the trader's response to the complaint, if any"
      confirmation: "Happy for us to contact you?"
Error messages require a little more configuration. Our form builder uses the full_message method for displaying error messages. The default Rails format is "%{attribute} %{message}" e.g. “Name can’t be blank”, where we prefer a more plain english format, e.g. “Enter your full name”.
To allow customising this fully we require i18n_customize_full_message to be enabled. This is set by default for you when you load the citizens_advice_components engine.
This then allows you to override the format in your locale files to something like this:
activemodel:
  errors:
    models:
      example_form:
        # https://guides.rubyonrails.org/configuring.html#configuring-active-model
        format: "%{message}"
        attributes:
          first_name:
            blank: Enter your first name
          last_name:
            blank: Enter your last name
          your_enquiry:
            blank: Provide details of your complaint or enquiry
          currency:
            inclusion: Select a currency
          total_amount:
            blank: Tell us the total amount paid for the goods or services
          date_of_purchase:
            blank: Tell us the date you purchased the goods or services
            less_than: Date of purchase must be in the past
            invalid_date: Date of purchase must be a valid date
          contacted_trader:
            blank: Tell us if you have contacted the trader about this complaint
            invalid: Tell us if you have contacted the trader about this complaint
Defining a controller
Before we can render our form we’ll need a controller. Because we’re using common Rails patterns for definining our form model this should look very familiar.
Assuming you’ve defined some routes for the form, our controller might look something like this:
class ExampleFormController < ApplicationController
  def new
    @form = ExampleForm.new
  end

  def create
    @form = ExampleForm.new(form_params)
    if @form.valid?
      redirect_to example_form_success_path
    else
      render :new
    end
  end

  def success
    # Do something when submitting the form
  end

  private

  def form_params
    params.expect(
      example_form: %i[
        first_name
        last_name
        currency
        your_enquiry
        total_amount
        date_of_purchase
        contacted_trader
        trader_response
      ]
    )
  end
end
Rendering the form
Finally, we can define a view using the Design System form helpers to actually render our form.
The core of our view should look something like this:
<%= form_with model: @form, url: example_form_create_path, method: :post, novalidate: true do |form| %>
  <%= form.cads_error_summary %>
  <h1 class="cads-page-title">Example form</h1>
  <!-- Your form fields here -->
  <%= form.cads_button "Submit complaint", icon_right: :arrow_right %>
<% end %>
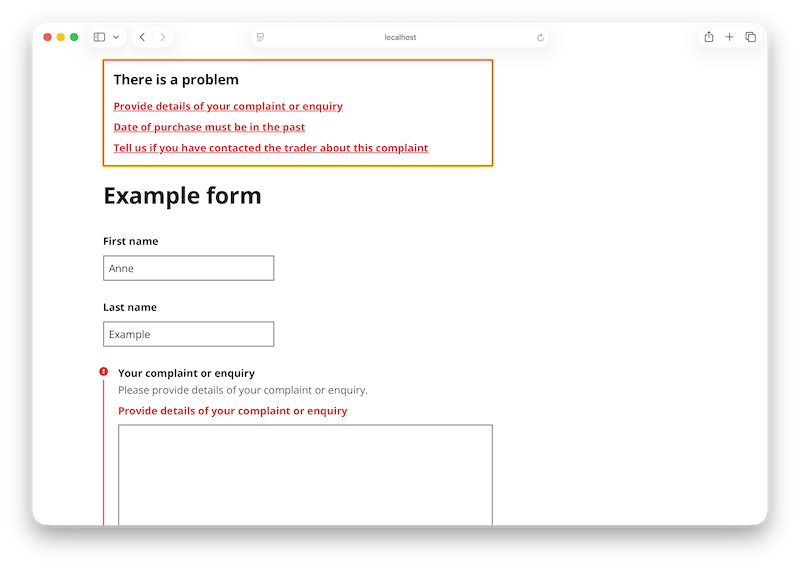
The magic here is the cads_error_summary method. This uses the Rails validations API behind the scenes and will display the first full_message for any errors present on the model. Nothing will be shown if no errors are present.
From here you can use the available form helpers to render each field:
<%= f.cads_text_field(:first_name, width: :sixteen_chars, required: true) %>

<%= f.cads_text_field(:last_name, width: :sixteen_chars, required: true) %>

<%= f.cads_text_area(
  :your_enquiry,
  hint: "Please provide details of your complaint or enquiry.",
  required: true
) %>

<%= f.cads_collection_select(
  :currency,
  [
    ["Choose an option", ""],
    ["GBP", "GBP"],
    ["EUR", "EUR"],
    ["USD", "USD"]
  ],
  :last,
  :first,
  required: true
)%>

<%= f.cads_text_field(
  :total_amount,
  hint: "Enter a value in pounds and pence only e.g. £112.00",
  width: :four_chars,
  required: true
) %>

<%= f.cads_date_field :date_of_purchase, required: true %>

<%= f.cads_collection_radio_buttons(
  :contacted_trader,
  [["Yes", "yes"], ["No", "no"]],
  :last,
  :first,
  required: true
)%>


<%= f.cads_text_area :trader_response %>
<%= f.cads_check_box :confirmation %>
Putting this all together this should look something like this:
Next steps
- Experiment with different options to each of the form helpers. You can find more detail on the options available in the component guides.
- Try defining some additional validations and seeing how that corresponds to the locale file
- Look at the additional examples in the demo app
Questions and contributions
For National Citizens Advice staff you can find us in the #design-system channel on Slack. For open issues, roadmap, and source code see the GitHub project.